My 3 year old son was very disappointed with the early voting process…mainly because he thought were were going boating.
Article Limits on News Sites
Today I decided to take a look at the New York Times website for the first time in several years. I probably read one or two articles there each month, but only when I find the link from another source, but I haven’t gone to the site to look for news for quite a while. I started browsing the tech section, looked at a few articles and pretty soon got a windows telling me that since I had seen 10 articles, I needed to pay or come back in a month.
Obviously the NYTimes can handle their subscriptions however they like, but I had to wonder if this really accomplished what they want. For me, it means I’ll probably never browse their site. Instead I’ll wait for links to be sent to me by friends or posted on social news sites. The chances of ten of those articles being something I want to read are quite a bit higher than 10 articles I read while clicking around on their site.
So basically their strategy prevents me from using their site as my default go-to page for news, but allows me to read anything that I probably want to read. This would seem indicate that the value of a reading coming in to read a handful of articles each month is worth more to them than someone who visits the site a few times each day. I would think that the advertising value of a regular visitor would be greater than an occasional one.
Of course their goal is to get people to sign up for a subscription. This approach may be driven more by the idea that someone who pays for the subscription can fetch a much higher cost per impression from advertisers than someone who doesn’t pay. But that still seems backwards to me. The value of an impression to an advertiser is less related to how much the viewer paid to read the content and more related to how well the impression can be targeted.
The NY Times previous policy of requiring a free login to read articles seemed to be taking that approach. By requiring a login, they could track what readers interest and then sell advertising that target specific demographics by reading habits. I’d be very interested to know if they decided this approach just didn’t work or if it was never fully developed and the company just defaulted back to the old model of charging for subscriptions.
Why You Need Domain Knowledge

This is the Feinwerkbau P11 Piccolo Air Pistol. It costs somewhere around $1,500 and looks like it is mainly designed for people doing competition. The black barrel is what shoots the pellet and the silver barrel is the compressed air.
If you have a gun that runs on compressed air, it would be nice to know how much air you have left wouldn’t it? I’m not sure the design was fully thought through.
I don’t know the story of the gun, but I do know that you shouldn’t need to point the barrel toward your face to read a gauge.
When I see something like this I like to stop and think about whether or not I make the same mistakes in my field of software development. Poor design decisions aren’t limited to guns.
Domain Experts & Software
Mistakes in software design aren’t always as easy to spot, but often it comes down to the same thing. To design something you must have at least a basic level of domain knowledge. That doesn’t means you have to be a world famous chef in order to write a recipe webapp, but you need to make sure you at least know the basics.
If you don’t have the domain knowledge, then partner with someone who has it. I’ve been working on an application for the past year where I partnered with non-technical people who know the industry. It would have been easy to discount the value of people who can’t really contribute to writing the software, but it has been well worth it. Not only do they have the knowledge of the industry that let us create the right product, but they know the people who would be interested in buying it.
Just having a good idea and the ability to create software isn’t enough to succeed. You can significantly increase your chances by partnering with people who are in your target market who can use the product from the very beginning. If you choose carefully you can get not only their expertise in the domain, but also their network of connections–people who have the exact same problems that your product can fix.
Now some people have pointed out that a company that makes guns probably has much more domain knowledge about air powered pistols than I do. That is probably true. I have a reasonable amount of domain knowledge about guns including some classes, etc. One of the first things you learn anytime you learn anything about guns is not to point it at your face.
But this brings up an important point. Having domain knowledge and applying it are two different things.
Testing Software
When it comes to software, we have the luxury of testing. Get your code to a usable state and then let someone use it. Sometimes you’ll find that there is a disconnect between what works and what the domain experts tell you will work. This doesn’t mean you have a bad expert. They may be an expert in their field, but that doesn’t mean they are an expert at explaining it to you. Often this means that as part of the development process they will say you need to do X and then after they use it, change their mind and say you need to do Y.
This isn’t a bad thing and is a natural part of building something correctly. What you can do is try to make sure that those experiences come early and with as little pain as possible.
I was working on a project awhile back where we put most of our effort into the public facing portion of a web app. The backend was a mess through. It worked but it was very ugly. But it let us launch quickly and get some real world experience. By the time we were ready to redo the backend, the people who were using it had a lot better idea of what they needed. Many of the initial things that they wanted to change turned out to be irrelevant, but there were a bunch of other assumptions that it turned out were wrong and needed to be changed.
Domain expertise will usually get you headed in the right direction, but you don’t know if you’ve done the right thing until someone is actually using your code.
Connecting Visual VM to Tomcat 7
Connecting Visual VM to a remote instance of Tomcat 7 is surprisingly easy. All you have to do is add some options to JAVA_OPTS turning on JMX, specifying how you want to handle security and setting the hostname. While it is easy to get it up and running, there are quite a few steps to go through if you want to make it work with authentication and behind a firewall.
My goal with this post is to walk through the basics of getting it running and then modifying the installation to support common configuration needs.
Here are instructions for how to set it up using Ubuntu 11.10:
First lets install Tomcat 7 if you don’t have it.
sudo apt-get update
sudo apt-get upgrade
sudo apt-get install tomcat7
Now we need to set the JAVA_OPTS. We will do that by creating a setenv.sh file in /usr/share/tomcat7/bin/ and putting the options in there. setenv.sh gets called before Tomcat starts to set any environmental variables you may want.
export JAVA_OPTS="-Dcom.sun.management.jmxremote=true \
                  -Dcom.sun.management.jmxremote.port=9090 \
                  -Dcom.sun.management.jmxremote.ssl=false \
                  -Dcom.sun.management.jmxremote.authenticate=false \
                  -Djava.rmi.server.hostname=50.112.22.47"
Line 1 enables jmxremote. Line 2 specifies the port. Line 3 says that we don’t need to use ssl. Line 4 says to leave it wide open and not use any type of authentication. Line 5 specifies the ip address of the server where you are running Tomcat. (Don’t use my ip address of 50.112.22.47, substitute your own.) This is left out of many instructions on the web, so it might work in some circumstances without it, but I wasn’t able to connect with VisualVM unless this configuration points to itself.
I believe this has to do with the fact that JMX is going to open another connection on a random port (discussed below). If you don’t tell it what its hostname (or ip) is, JMX doesn’t know how to tell the client how to connect back to that other port.
Now open VisualVM. On OS X you just run:
jvisualvm
Add the connection by clicking on File > Add JMX Connection… and fill out the dialog box as shown (but using the ip address of your server).
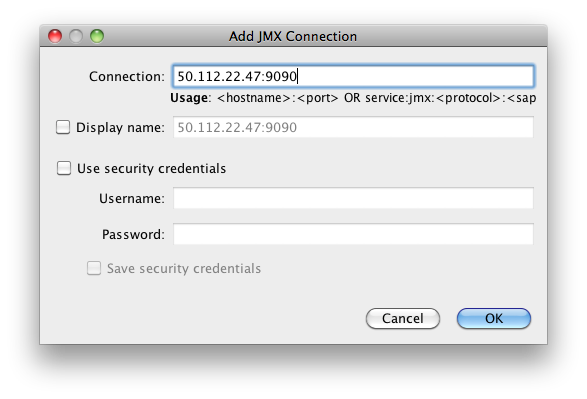
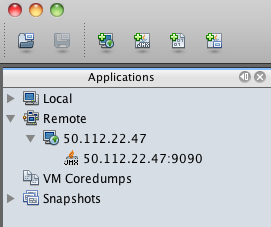
Once you add it, you should see the server in the list on the left hand side. Double click on the JMX connection to the server. (The JMX connection has a JMX icon and should show port 9090.)
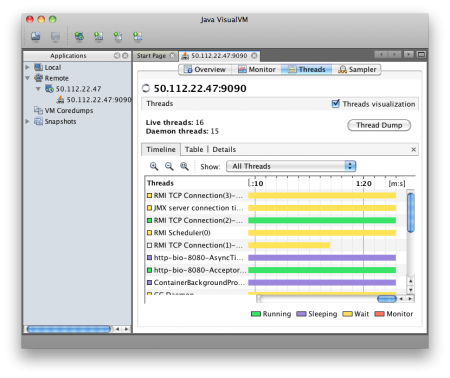
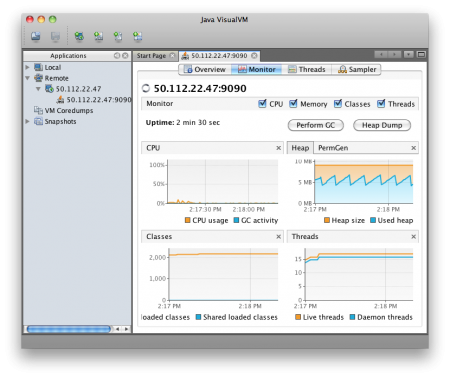
You should then be able to view the following screens of information showing what is going on inside of Tomcat.
Firewall
One problem people run into in getting this to work is that they open port 9090 (or whatever they have specified) and VisualVM is unable to connect. This is because JMX appears to accept connections port 9090, but then opens at least one other random port and instructs the client to connect to this port as well.
If we run
sudo netstat -ntlp
We should see something like this:
ubuntu@ip-10-252-22-93:~$ sudo netstat -ntlp
Active Internet connections (only servers)
Proto Recv-Q Send-Q Local Address           Foreign Address         State       PID/Program name
tcp        0      0 0.0.0.0:22              0.0.0.0:*               LISTEN      494/sshd
tcp6       0      0 :::8080                 :::*                    LISTEN      2650/java
tcp6       0      0 :::36851                :::*                    LISTEN      2650/java
tcp6       0      0 :::22                   :::*                    LISTEN      494/sshd
tcp6       0      0 :::35543                :::*                    LISTEN      2650/java
tcp6       0      0 :::9090                 :::*                    LISTEN      2650/java
Line 4 shows ssh running on port 22. 5 is where Tomcat is serving HTTP. 9 shows the JMX connection. However 6 & 8 appear to be part of the JMX process. If you have firewall that is blocking access to these ports, VisualVM won’t be able to connect. You can’t just add those specific ports because they are random and can change every time Tomcat is restarted. So you have to leave your machine wide open to connect or use the Listener that will be explained a few sections below.
Authentication
Now lets look at how to secure the connection a bit and require a username and password. We can change the settings we put into setenv.sh to tell it to require authentication by changing false to true.
export JAVA_OPTS="-Dcom.sun.management.jmxremote=true \
                  -Dcom.sun.management.jmxremote.port=9090 \
                  -Dcom.sun.management.jmxremote.ssl=false \
                  -Dcom.sun.management.jmxremote.authenticate=true \
                  -Djava.rmi.server.hostname=50.112.22.47"
By default this should look for two files. One is called jmxremote.access and the other is jmxremote.password. It will probably look for the files in /usr/lib/jvm/java-6-openjdk/jre/lib/management/ but this may be different depending on which JDK you have installed and in some cases it will look for the files in the CATALINA_HOME directory.
We need to specify where the files should be found with the following options. Here we specify the files will be in the tomcat7/conf directories. So now our /usr/share/tomcat7/setenv.sh file should look like:
export JAVA_OPTS="-Dcom.sun.management.jmxremote=true \
 -Dcom.sun.management.jmxremote.port=9090 \
 -Dcom.sun.management.jmxremote.ssl=false \
 -Dcom.sun.management.jmxremote.authenticate=true \
 -Djava.rmi.server.hostname=50.112.22.47 \
 -Dcom.sun.management.jmxremote.password.file=/var/lib/tomcat7/conf/jmxremote.password \
 -Dcom.sun.management.jmxremote.access.file=/var/lib/tomcat7/conf/jmxremote.access"
jmxremote.password should look something like:
jmxadmin mysecretpassword
and jmxremote.access should have something like:
jmxadmin readwrite
Our user is jmxadmin, but could be any username. jmxremote.password tells what password is assigned to each user and jmxremote.access tells what access rights each user has. For a user to have access, they need to have an entry in both files.
Now if you try to run this setup, you will probably see something like this error in your catalina.out file:
Error: Password file read access must be restricted: /var/lib/tomcat7/conf/jmxremote.password
To fix this we need to make sure that both files are owned by the tomcat7 user:
sudo chown tomcat7:tomcat7 /var/lib/tomcat7/conf/jmxremote.*
Then we need to make sure that the tomcat7 user is the only user who has read access.
sudo chmod 0600 /var/lib/tomcat7/conf/jmxremote.*
Now you should be able to create a new connection to the server as before, but this time specifying the username and password you wish to use to connect. VisualVM wouldn’t let me just modify an existing JMX connection, so I had to create a new one rather than just adding the username and password to the existing connection.
Controlling the Ports
The only remaining inconvenience is the fact that JMX is going to choose a random port. If you aren’t dealing with a firewall this might not be a big deal, but if you are dealing with a remote server in a data center or in the cloud, it becomes more problematic. We need some way to tell Tomcat to bind the other JMX ports to a specific port number rather than choosing something at random.
We can do this by adding a listener to the /var/lib/tomcat7/conf/server.xml file like this:
<Listener className="org.apache.catalina.mbeans.JmxRemoteLifecycleListener"
  rmiRegistryPortPlatform="9090" rmiServerPortPlatform="9091" />
Just put it below the other Listeners in server.xml. Notice the rmiRegistryPortPlatform is the 9090 that we previously specified in setenv.sh. The rmiServerPortPlatform allows us to bind the process to 9091 instead of a random port number.
Note: You can now remove the line that specifies port 9090 in setenv.sh.
In addition to adding the Listener we need to put the jar in /usr/share/tomcat7/lib/. The jar we are looking for is called catalina-jmx-remote.jar.
To locate this jar, first determine what version of Tomcat you are using by running the version script which will give us the output as shown.
ubuntu@ip-10-252-22-93:$ /usr/share/tomcat7/bin/version.sh
Using CATALINA_BASE:   /usr/share/tomcat7
Using CATALINA_HOME:   /usr/share/tomcat7
Using CATALINA_TMPDIR: /usr/share/tomcat7/temp
Using JRE_HOME:        /usr
Using CLASSPATH:       /usr/share/tomcat7/bin/bootstrap.jar:/usr/share/tomcat7/bin/tomcat-juli.jar
Server version: Apache Tomcat/7.0.21
Server built:   Sep 8 2011 01:23:08
Server number:  ...0
OS Name:        Linux
OS Version:     3.0.0-14-virtual
Architecture:   amd64
JVM Version:    1.6.0_23-b23
JVM Vendor:     Sun Microsystems Inc.
In our case we are using Tomcat/7.0.21, so we want to go to http://archive.apache.org/dist/tomcat/tomcat-7/v7.0.21/bin/extras/. You can substitute your own version number in the URL to find the file.
Once the file is in /usr/share/tomcat7/lib/, restart your tomcat server and create a new JMX connection as specified above using VisualVM. You should now have a server that requires authenticated access for JMX and where you don’t have to leave all of the ports open.
There is also a way to tunnel VisualVM over an SSH connection for people who want even stronger security, but we aren’t going to address that in this post.
Other Notes
I have seen cases where VisualVM stops showing the Monitor and Threads tabs. If you delete the connection and add it again, they come back. I’m not sure why, but it is worth trying if you aren’t seeing all the data you expect.
Visual VM allows you to add plugins. They can be found under the Tools > Plugin menu option. They are supposed to download when you select them, but I kept getting a failure when trying to install the Visual GC garbage connection plugin.
I was able to get it to install by switching to JDK 1.6 (from Apple) instead of OpenJDK 1.7 on the client. However, when I tried to use Visual GC it said “Not supported for this JVM”. I wasn’t clear if that meant that the client or the server wasn’t supported, but I think it was complaining because the server is using OpenJDK 1.6 instead of the Oracle JDK.
Selling 10,000 Copies of Evernote Essentials.
If you have any interest in selling something online, take a look at Lessons Learned from Selling Evernote Essentials where Brett Kelly talks about selling his first 10,000 copies of his ebook about Evernote. (Also check out his tech podcast.)


 Facebook
 Flickr
 Google Plus
 LinkedIn
 Twitter
 YouTube
